Showing posts with label recipes. Show all posts

Wednesday, July 7, 2010

Braised Lamb Shank

Like I've mentioned before, lamb is one of my favorite meats, especially the shank. It's a cheapy cut of meat, but when it's braised, it becomes absolutely sumptuous and wonderful. Here's my recipe for the most delicious braised lamb shank.

Braised Lamb Shank

Lamb shanks - 6
Sea salt - to season shanks
Cracked black pepper - to season shanks
Olive oil - 2 tbsp
Garlic cloves, thinly sliced - 2
Rosemary (fresh), chopped - 1 tbsp
Red pepper flakes - 3 tsp
Pinot Grigio (or other dry white wine) - ½ cup
Beef stock - 1 ½ cup
Tomatoes (canned, whole) - 1 cup
Parsley (fresh), chopped - 1 tbsp

Method:

1. Using paper towels, pat the shanks dry

2. Liberally season all 6 shanks with sea salt & cracked black pepper

3. In a large, heavy pot (preferably a Dutch oven), warm the olive oil over medium heat

4. Add the lamb shanks and brown on all sides. Should take about 15 minutes

5. Tip the pot, and spoon out the excess fat

6. Add the garlic, rosemary, and crushed red pepper, and sauté for 1 minute

7. Add the wine and bring it to a simmer.

8. Add the stock and tomatoes. Reduce the heat to low, cover, and simmer the shanks, turning them occasionally, until the meat is fork tender. This will take about 1 ½ hours.

9. When ready to plate, remove the shanks from the pot, and spoon the sauce over the lamb, and sprinkle with fresh parsley and a sprig of aromatic
rosemary. I like to serve it with rice, cous cous, or potato puree.

This meat is absolutely succulent. It makes the perfect winter meal, or the perfect summer night transport meal, just crank up the A/C and make pretend. Enjoy it!

Copyright 2010, Brian Griess, All rights reserved

Monday, June 21, 2010

BMF Fish Taco

Let’s put together the most amazing fish taco. 3 components make a fish taco perfect for me…

1. Fish
2. Condiment/Sauce
3. Batter


… Hold up, BATTER? That’s right… Now, I’ll enjoy a light grilled fish taco every now and then, but when I want to grub it out, I need a fish-and-chips style piece of fish. Big, crunchy, moist, and flavorful.

What kind of fish? It’s got to be cod, haddock, or hake. It has to be a white fish for this recipe.

The most perfect taco has to come with some kind of sauce, in my opinion. I really like a chipotle mayonnaise on my fish tacos. Here’s the recipe:

Chipotle Mayonnaise

Mayonnaise - 1 ½ cups
Cilantro, chopped - 1 tbsp
Lime juice - 1 tbsp
Chipotle puree - 2 tbsp
Salt - pinch
Black pepper - pinch

Method: Whisk all ingredients together.

* Make chipotle puree by blending the contents of a can of “chipotle peppers in adobo”

The bit of freshness that puts this recipe over the top is a bright little cabbage slaw that, in musical terms would be something like a "hee-hee." - it's the high note that takes it to the next level.

Cabbage Slaw

Cabbage, shredded (green and/or red) - 1 head
Olive oil - 1 ½ tbsp
Lime juice - 2 tsp
Coriander seed - ½ tsp
Salt - pinch
Black pepper - pinch

Method: Toss together and chill.

For a batter, this will be your typical beer batter. You can actually turn this into fish & chips quite easily by using this batter. It’s also perfect for chicken fingers.

Beer Batter
(this batter will work great for chicken fingers, onion rings, shrimp, etc..)


Eggs, large - 3
Dark beer (New Castle, Sam Adams) - 8 oz
Dry mustard - 2 tsp
Chili powder, dark - 1 tbsp
Salt - 1 tbsp
Sugar - 1 tsp
Flour (A.P.) - 1 ½ cup

Method: Whisk very well until there are no lumps.

Now, to batter the fish…

Method:

1. Dredge fish in the flour, and place in the batter.

2. Heat oil to 375°F

3. Place floured-and-battered fish into hot oil and cook until golden brown.

4. Assembling these tacos is a cinch. Lay the fried piece of fish on a warm tortilla, top it with a small amount of cabbage slaw, and a drizzle of chipotle mayo.


This is one of those great transport meals. It doesn't even matter the time of year, because this is something that can be the star of a summer-themed party in the dead of winter that will make anyone feel like they've been whisked away to an island.

Copyright 2010, Brian Griess, All rights reserved

Tuesday, June 15, 2010

"Best I Ever Had" BBQ Sauce

What is BBQ to you?

Depending on the area of the country you live in, it could mean many different things. If you're in the Carolinas, you probably stick to a vinegar-based sauce. If you represent Memphis, you'll be most likely to enjoy a hot, sweet tomato-based sauce. Kansas City folks will enjoy a thicker, more molasses-y sauce. Texans seem to focus more on the dry rub, and the sauce is an accessory for dipping.

Now, my idol WWE Hall of Famer Jim Ross has a BBQ sauce that he sells on his website (http://www.jrsbarbq.com/) and I will tell you, it is the greatest store-bought 'Q sauce I've ever tasted. I'd recommend getting a bottle of that just to keep in the fridge.

Now, I have a recipe for what I can promise you is the greatest BBQ sauce you will ever taste.

Let's do this thing:

"Best I Ever Had" BBQ Sauce
(this recipe makes a bunch of sauce, but it saves extremely well. Keep whatever's left in the fridge.)


Butter - ¼ lb
Onion (minced) - ¾ cup
Garlic (minced) - ½ cup
Lemon - 1 whole
Ketchup - 4 ½ cup
Tomato juice - 1 cup
Light brown sugar - ¾ cup
Molasses - 6 tbsp
Worcestershire sauce - ½ cup
Chili powder - ½ cup
Apple cider vinegar - 4 tbsp
Chipotle peppers in Adobo - 1 small can
Water - 3 cups
Salt - pinch (to taste)

Method:

1. Mince onion & garlic (you can use a mini food processor to make it easier on you).

2. Melt butter in a stockpot, on medium heat.

3. Add minced onion & garlic to the melted butter. Sweat for 7 minutes.

4. Pour small can of Chipotle peppers in Adobo into a food processor and blend until finely chopped. Add to stockpot.

5. Zest lemon, and juice into stockpot.

6. Add ketchup, tomato juice, brown sugar, molasses, worcestershire, chili powder, vinegar, water & salt. Stir (or whisk) to combine.

7. Bring to boil, reduce to simmer.

8. Simmer for 30 minutes.

9. Allow to cool before storing.

* Whenever basting with sauce, always heat the sauce up first to enhance flavor.

Copyright 2010, Brian Griess, All rights reserved

Friday, June 4, 2010

Cheesecake Ice Cream

If you're like me, you could probably eat a tub of that store-bought "cheesecake filling" - don't be ashamed. Cheesecake is one of those beautiful things, it's like rolling around in satin sheets, it's soft, it's velvety, and it's cold.

One of my guilty pleasures is Ben & Jerry's Ice Cream. One of their seasonal flavors is Pumpkin Cheesecake, and oh man... It was overload for me, and from that day, nothing says Fall/Autumn to me like a B&J's Pumpkin Cheesecake milkshake.

Once I discovered that cheesecake & ice cream could be combined into this beautiful harmony joyride, I began experimenting with ways to do it. Here is the recipe I settled upon.

Cheesecake Ice Cream

* Now to make this, there are two components, a regular vanilla ice cream base, and the cheesecake filling. If you want regular vanilla ice cream, just omit the cheesecake filling, but this is the basic 'custard' that you start with to make most ice creams. Be creative!

Ice Cream base

Egg yolks - 6
Sugar - 12 oz
Milk - 1 ½ pints
Heavy cream - ½ pint
Vanilla extract - 2 tsp
Salt - pinch

Method:

1. Whip egg yolks and sugar together until pale yellow, and smooth.

2. Scald milk, and beat into the egg/sugar mixture (#1)

3. Heat over a double boiler until thickened (2x the original volume)

4. Remove from heat and stir in cold cream, salt & vanilla. Chill thoroughly.


Cheesecake Filling

Cream cheese - 2 lb
Sugar - 7 oz
Orange zest - 2 tsp
Lemon juice - 1 ½ oz

Method:

1. In a mixer (or by hand, with a whisk) mix together all ingredients until it is smooth.

2. Add cheesecake filling into custard, chill & freeze in your standard ice cream machine.


Now some of you will have to go purchase an ice cream machine in order to make this, but I suggest you do so. It is super simple to make at home, and you control all of the ingredients going into it.

Copyright 2010, Brian Griess, All rights reserved

Tuesday, June 1, 2010

Raspberry-Peach Bellini

If you're looking for a cocktail to serve at your next summer gathering, this drink is perfect for any time of day, especially brunch. If you don't drink, you can easily turn this into a smoothie by boosting up the nectar & puree, adding some ice and leaving the Prosecco out.

Raspberry-Peach Bellini
(recipe for 4 glasses)


Peach nectar (popular brands are Goya® and Kerns®) - 4 tablespoon
Prosecco (or other sparking wine, or dry champagne) - 1 bottle (chilled)
Raspberry puree (recipe below) - 2 tablespoons

Method: Spoon 1 tablespoon of the peach nectar into a Champagne glass. Slowly fill the glass with Prosecco. Add ½ tablespoon of raspberry puree on top, and stir.

* If you don’t have, or can’t find peach nectar--simply take frozen peaches, thaw them, and blend them in a blender until smooth.

Raspberry Puree

Raspberries (or any berry - be creative!)
Sugar
Lemon juice

* The key to this is ¼ cup of sugar & 1 tablespoon of lemon juice to every pint of raspberries.

Method: In a saucepan, over medium heat, add all ingredients and heat, stirring occasionally, until the berries give up their juices. Bring the liquid to a boil and keep cooking until the mixture has thickened but is still quite liquid. Pour the berry mixture through a strainer to remove the seeds. Press down with a spoon to force the juices through. Transfer to a container and store in the fridge until ready to serve.

* This puree will keep for about 1-2 weeks, and tastes great over vanilla ice cream!

Few things go together like peaches and raspberries, the combination is magical. Add some raspberries to your next peach pie, or cobbler. Or drizzle some raspberry puree over some peach sorbet. It is big time live, I assure you.

Copyright 2010, Brian Griess, All rights reserved

Sunday, May 30, 2010

Stuffed Pasta: Agnolotti, Ravioli, Cappelletti, Tortellini

This entry is dedicated to the art of stuffed pasta. Few things make me as excited as a big plate of agnolotti or ravioli. I know that these long Italian names can be intimidating, so let me break down the different shapes for you.
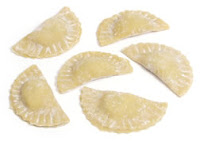


Agnolotti - "Priests' Cap." Crescent shape stuffed pasta


Ravioli - Little square or round pillows
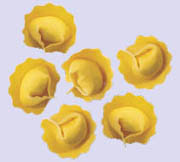


Cappelletti - "Little hats." Hat-shaped stuffed pasta


Tortellini - "Little twists." Small and stuffed pasta.
-------------------------------------

Now, in our last entry, we made pasta dough.

This recipe picks up with a room temperature ball of dough. Let's do this thing:

Place your dough ball onto a lightly floured surface. Cut the dough into four equal pieces. Take 1 piece (covering the remainder with the damp towel) & flatten it with your hand until it’s flat enough to run through your pasta machine. If you don’t have a machine you can roll your dough out with a rolling pin. Continue to run it through the machine until you have achieved a very thin strip. Repeat this with the other 3 pieces of dough until all are uniform.

At this point put on a large pot of water of boil. Season it liberally with salt, and a few drops of olive oil.

At this point, you will pipe (or spoon) your filling onto the dough. We will talk about fillings after we finish the method.

Onto TWO dough strips, pipe (or spoon) about a tablespoon of filling at equal intervals along the strips.


Place the strips without filling on top of the ones with filling, and press down well around the filling. Using a pastry wheel cut your pasta into equal sized squares. Cover your completed filled pasta with a kitchen towel while you are preparing the sauce & waiting on the water to boil. If you leave it out in the open, the pasta will dry out, possibly crack, and nobody wants exploding stuffed pasta.

When the water comes to boil, add your filled pasta (cook a few at a time, if you crowd the pan, there's more of a chance they will stick together, or cook unevenly.) Once the filled pasta rise to the top, they are done. They will cook very quickly. Remove with a slotted spoon & set onto a plate.

Toss the cooked filled pasta into the sauce pan, and you've got a gourmet pasta dish fresh from Italy.

Now, what do I fill it with? What kind of sauce?

Here are some of my favorite fillings:

Ricotta & Asparagus Agnolotti

Asparagus - 7 pencil thin spears
Ricotta - 1 cup, fresh (drained)
Salt - 2 teaspoon
Pepper - ½ teaspoon
Parmigiano-Reggiano - 1 cup (shredded)

Method: Cook asparagus in boiling salted water until they are tender (about 2 minutes depending on thickness) - remove and shock in ice water. Cut asparagus thinly, on a bias - Mix ricotta, asparagus, salt & pepper, and Parmigiano-Reggiano.

Pumpkin & Sage Ravioli

Pumpkin Puree - 1 (small) can
Sage (fresh) - 1 tablespoon
Walnuts - ½ cup (finely chopped)
Butter - 2 tablespoon
Salt - 1 teaspoon
White Pepper - ½ teaspoon

Method: In a small sauté pan, add pumpkin puree and cook until heated through. Stir in sage, walnuts & butter. Add salt & white pepper - remove from heat and let cool.

Mozzarella & Spinach Tortellini

Buffalo mozzarella - 1 cup (shredded)
Asiago cheese - ½ cup (shredded)
Ricotta cheese - ½ cup
Milk - ¼ cup
Parsley - ½ teaspoon
Nutmeg (ground) - ¼ teaspoon
White pepper - ¼ teaspoon
Spinach (frozen) - 1 (10 oz.) package (thawed, drained, chopped)

Method: Blend together in food processor.

Italian Meat Cappelletti

Ground beef - ½ lb
Italian sausage - ¼ lb
Egg - 1, slightly beaten
Breadcrumbs - ¼ cup
Parmigiano-Reggiano (grated) - 2 tablespoons
Parsley (fresh) - 1 tablespoon (minced)
Onion (grated) - 1 tablespoon
Salt - ½ teaspoon
Basil (dried) - ½ teaspoon
Lemon zest - 1 teaspoon
Lemon juice - ½ teaspoon
Black pepper - ¼ teaspoon

Method: Brown ground beef and sausage in skillet (drain fat after cooking). Allow to cool. After cooled, add other ingredients and mix well.

As far as sauces go, your classic tomato, or alfredo sauce would work well on all of these, aside from the pumpkin/sage ravioli. For that, I use a sage-brown butter sauce. Here's the recipe.

Sage-Brown Butter Sauce

Unsalted butter - 6 tablespoons
Sage (fresh) - 15 leaves)
Chicken broth - ¼ cup

Method: Melt butter in a frying pan until the solids have brown. Add sage and chicken broth and simmer until the sauce has reduced and slightly thickened. Season with salt and black pepper.

I hope this has peaked your interest in fresh pasta. It can be a fun, family event or it can be a labor of love that one person makes for that special person, or people in his/her life.

Copyright 2010, Brian Griess, All rights reserved

Friday, May 28, 2010

Pasta Dough

This pasta dough is fool-proof. Since I started making pasta, I have played around and I honestly can't find a better recipe than Thomas Keller's recipe. So here it is:

Thomas Keller's Pasta Dough
[from The French Laundry Cookbook by Thomas Keller]


1 3/4 cups (8 ounces) all-purpose flour
6 large egg yolks
1 large egg
1 1/2 teaspoons olive oil
1 tablespoon milk

Mound the flour on a board or other surface and create a well in the center, pushing the flour to all sides to make a ring with sides about 1 inch wide. Make sure that the well is wide enough to hold all the eggs without spilling.

Pour the egg yolks, egg, oil, and milk into the well. Use your fingers to break the eggs up. Still using your fingers, begin turning the eggs in a circular motion, keeping them within the well and not allowing them to spill over the sides. This circular motion allows the eggs to gradually pull in flour from the sides of the well; it is important that the flour not be incorporated too rapidly, or your dough will be lumpy. Keep moving the eggs while slowly incorporating the flour. Using a pastry scraper, occasionally push the flour toward the eggs; the flour should be moved only enough to maintain the gradual incorporation of the flour, and the eggs should continue to be contained within the well. The mixture will thicken and eventually get too tight to keep turning with your fingers.

When the dough begins thickening and starts lifting itself from the board, begin incorporating the remaining flour with the pastry scraper by lifting the flour up and over the dough that's beginning to form and cutting it into the dough. When the remaining flour from the sides of the well has been cut into the dough, the dough will still look shaggy. Bring the dough together with the palms of your hands and form it into a ball. It will look flaky but will hold together.

Knead the dough by pressing it, bit by bit, in a forward motion with the heels of your hands rather than folding it over on itself as you would with a bread dough. Re-form the dough into a ball and repeat the process several times. The dough should feel moist but not sticky. Let the dough rest for a few minutes while you clean the work surface.

Dust the clean work surface with a little flour. Knead the dough by pushing against it in a forward motion with the heels of your hands. Form the dough into a ball again and knead it again. Keep kneading in this forward motion until the dough becomes silky-smooth. The dough is ready when you can pull your finger through it and the dough wants to snap back into place. The kneading process can take anywhere from 10 to 15 minutes. Even if you think you are finished kneading, knead it for an extra ten minutes; you cannot overknead this dough. It is important to work the dough long enough to pass the pull test; otherwise, when it rests, it will collapse.

Basically, knead til your arms hurt.

Double-wrap the dough in plastic wrap to ensure that it does not dry out. Let the dough rest for at least 30 minutes and up to 1 hour before rolling it through a pasta machine. The dough can be made a day ahead, wrapped and refrigerated; bring to room temperature before proceeding.

Here are pictures of the 3 basic stages of the recipe:


"Well Method"

"Shaggy" - Starting to come together..

Success!


I really can't describe the difference between dried and fresh pasta. Once you try it, you will see the final product is well-worth the small amount of labor.

Good luck, guys. I'll be blogging about some of my favorite pasta dishes next. Get this dough made, and chilling in the fridge. Then we can decide what to do with it!

Copyright 2010, Brian Griess, All rights reserved

Thursday, May 20, 2010

Gourmet Pizza

Last week, I gave you my recipe for a really great pizza dough, however I didn't give you any actual pizza recipes. Now I'm back to do just that.

Starting off, there are 4 foundations I use on my pizzas:
  • traditional red pizza sauce
  • white sauce (garlic aioli)
  • basil pesto sauce
  • extra virgin olive oil
Let's get to it:
  • Traditional Pizza Sauce (1 serving):
** I don't cook my pizza sauce. I think it dulls the brightness of the tomato. I like to dress my pizza with a cold sauce, and let the sauce cook while the pizza does.

San Marzano Tomatoes (whole, crushed) - 2.5 cups
Tomato Puree - 1 cup
Fresh Garlic (minced) - 3 cloves
Oregano (dried) - 1 tablespoons
Basil (fresh, chopped) - 2 tablespoons
Salt - 1 tablespoon
White pepper - 2 teaspoons
Crushed red pepper - 3 teaspoons

Method: Put in food processor, and puree until smooth. Let it sit overnight in order for flavors to marry and reach their full potential flavor.

  • White Sauce [Garlic Aioli] (1 serving):
** A traditional aioli uses egg yolk and Dijon mustard. I like to simplify it and use store-bought mayonnaise instead. I also like to make a little extra, and reserve some of this to dip the crust into. It's awesome.

Mayonnaise - 4 cups
Garlic (minced) - 4 tablespoons
Water - 2 tablespoons
Lemon juice - 1 tablespoon
Salt - 2 teaspoons
White pepper - 1 teaspoon

Method: Combine in food processor and pulse until combined.

  • Basil Pesto (1 serving):
** I use walnuts in my pesto instead of the usual pine nuts because walnuts are a superfood with many nutritional benefits. It's a nice way to sneak in somethin' like that.

Basil (fresh, whole leaves) - 2 cups
Parmesan Cheese (grated) - 1/2 cup
Extra virgin olive oil - 1/2 cup
Garlic (minced) - 4 cloves
Walnuts - 1/3 cup
Salt - 2 teaspoon
White pepper - 1 teaspoon

Method: Combine basil, Parmesan cheese, garlic, and walnuts into food processor. Mix. Once it starts coming together, drizzle in extra virgin olive oil. Season and chill.

  • Extra Virgin Olive Oil:
** Simply brush Extra Virgin Olive Oil on your crust.

----------------------------------------

Now that you have your foundations, it's easy to pick toppings that will compliment the sauce. Below are my go-to's when I'm making a pie:

Traditional red sauce: Pepperoni, Sausage, Bacon, Ground Beef, Roma Tomatoes, Mushrooms, Jalapenos, Caramelized Onions, Sun-dried Tomatoes, Fresh Basil, Roasted Peppers, Pineapple, Mozzarella Cheese

White sauce/garlic aioli: Grilled Chicken, Sausage, Bacon, Roma Tomatoes, Mushrooms, Artichoke Hearts, Banana Peppers, Jalapenos, Asparagus, Caramelized Onions, Roasted Walnuts, Baby Spinach, Roasted Zucchini/Eggplant, Asiago Cheese, Goat Cheese, Gorgonzola Cheese, Feta Cheese, Ricotta Cheese, Mozzarella Cheese.

Pesto: Grilled Chicken, Roma Tomatoes, Kalamata Olives, Avocado, Sun-dried Tomatoes, Caramelized Onions, Goat Cheese, Feta Cheese, Mozzarella Cheese

Extra Virgin Olive Oil: Artichoke Hearts, Pears, Mushrooms, Prosciutto, Avocado, Jalapenos, Banana Peppers, Caramelized Onions, Cantaloupe/Melon, Sun-dried Tomatoes, Fresh Basil, Roma Tomatoes, Roasted Peppers, Baby Spinach, Kalamata Olives, Roasted Zucchini/Eggplant, Asiago Cheese, Gorgonzola Cheese, Feta Cheese, Ricotta Cheese, Mozzarella.

---------------------------------------------

Some of my favorite combos:

extra virgin olive oil - pears (thinly sliced) - Gorgonzola (crumbled) - mozzarella (shredded)

pesto sauce - kalamata olives - mozzarella (shredded) - sun-dried tomatoes (thinly sliced) - avocado (thinly sliced)

extra virgin olive oil - mozzarella (shredded) - asiago (shredded) - Gorgonzola (crumbled) - ricotta (spooned on top, one dollop per slice)

red sauce - pepperoni - mozzarella (shredded) - pepperoni - mozzarella (sliced) - dried Italian herbs

white sauce - grilled chicken - red pepper flakes - feta cheese (crumbled) - mozzarella cheese (shredded) - buffalo sauce (IE Frank's Red Hot)


---------------------------------------------

I hope you use some of these recipes, and let your creative flag fly as you venture into the art of gourmet pizza-making.

Copyright 2010, Brian Griess, All rights reserved

Saturday, May 15, 2010

Bananas Foster Cheesecake

Cheesecake is one of my most favorite desserts. Even after a big meal, I can usually find room for this velvety, sumptuous slice of Heaven. Cheesecake itself can be a blank canvas. Usually it's topped with a berry coulis. I find by mixing in unique flavors, you can remix traditional cheesecake into something truly incredible.

In this recipe, I've paired my favorite dessert with the very close second favorite: Bananas Foster. This New Orleans classic is super simple, yet fancy. Bananas, sliced, tossed in butter and brown sugar. Pour in a little rum, and ignite! Flames shoot from the pan as the butter and brown sugar turn into a lovely caramel, blanketing every banana slice. This mixture is then spooned over vanilla ice cream.

Now for the 1, 2 punch:
  • BANANAS FOSTER CHEESECAKE
Crust:
Graham Crackers (crushed) - 1 ½ Cup
Sugar - ¼ Cup
Butter (melted) - 5 tablespoons

Method:
1. Mix the graham crackers and sugar

2. Add butter and mix until completely moistened.

3. Press mixture into the bottom of a springform pan.

4. Refrigerate for 1 hour.


Filling:
Cream Cheese (room temperature) - 36 Oz.
Light Brown Sugar - 1 Cup
Cornstarch - 2 Tablespoon
Cinnamon (ground) 1 teaspoon
Eggs - 4 whole + 2 yolks
Bananas (pureed) - 1 ½ Cup
Bacardi (or whatever kind you like better) Rum - 4 Tablespoon
Vanilla Extract - 3 teaspoon

Method:
1. In large bowl, combine cream cheese, brown sugar, cornstarch and cinnamon until smooth.

2. Add eggs and egg yolks one at a time, beating well after each addition.

3. Beat in all remaining ingredients.

4. Pour into crust-lined pan.

5. Bake for 55 to 65 minutes or until center is firm to the touch.

6. Allow it to cool before serving.

7. Store in refrigerator.

-------------------------------------

I like to drizzle it with a little creme anglaise (or just melt some vanilla ice cream) to make it a little more traditional, yet new.

Copyright 2010, Brian Griess, All rights reserved

Sunday, May 9, 2010

Pizza Dough

bG's Perfect Pizza Dough
(Recipe for 2 good-sized pies)

A.P. Flour (use bread flour for a crispier crust) - 3 cups
Warm water - 1 cup
Extra Virgin Olive Oil - 1 ½ tablespoons
Dry Active Yeast - 1 packet
Kosher Salt - 2 teaspoon
Sugar - 1 teaspoon

*This recipe can also be made in your electric mixer.*

Method:

1. Bloom the yeast in warm water. Add olive oil & sugar, whisk. Let stand for 2-3 minutes.

2. Put half of the flour into a large bowl. Add salt.

3. Add the wet ingredients into the bowl of flour. Mix thoroughly. Begin to add the remaining flour little by little until it is all incorporated. The dough should be slightly sticky.

4. Transfer dough to a lightly floured surface, and knead for 5 minutes. Dough should be smooth, and not sticky.

5. Place dough into an oiled bowl, and set in a warm area (I heat my microwave for 25 seconds just to warm it) so it can proof (it will double in size). This will take 1 hour.

6. Preheat oven to 500° F.

7. Divide dough in 2 sections.

8. Shape as desired, and roll out to a 1/8-inch thickness.

9. Add sauce, cheese, toppings, etc.

10. The pizza will take about 10-12 minutes to cook depending on toppings and thickness of crust.

--------------------------

Once you have this method down, your creativity can run wild. Imagine impressing your friends or co-workers with a pear & gorgonzola pizza. how about a prosciutto & cantaloupe pie? of course a classic pepperoni pizza topped off with some buffalo mozzarella is never a bad thing.

The key is to be adventurous, try what you like. Don't be confined by the traditional red sauce, try just olive oil, or a white sauce on your pizza.

One of my favorite pizzas is a buffalo chicken pizza - garlic white sauce, grilled chicken, mozzarella cheese - drizzle on Frank's Red Hot sauce when it comes out of the oven. It's innovative, yet classic.

Stay tuned for more recipes, including some Big Time Live gourmet pizza party ideas.

Copyright 2010, Brian Griess, All rights reserved

Monday, April 26, 2010

"Fajita Bar"

When preparing a "Fajita Bar" for a gathering, I like to have a variety of unique sauces to top the fajitas with. It's that extra special thing that will spark conversation. I usually serve them in squeeze bottles.

I try to have 5 in total - 3 that I prepare from scratch, and usually a red (tomato) salsa, as well as a green (tomatillo) salsa. If the salsas are chunky, simply puree them in a food processor or blender until it reaches the consistency that you would like.

Here are 3 of my favorite sauces for fajitas:
  • Honey-Chipotle Sauce
Honey - ½ cup
Chipotle peppers in adobo - 2 tablespoon
Balsamic vinegar - 3 tablespoon
Dijon mustard - 2 tablespoon
Lime juice - ½ cup
Garlic (minced) - 2 tablespoon
Cilantro (chopped) - ¼ cup

Method: Put all ingredients in Food Processor - Mix until smooth.

  • Saffron-Orange Cream
Orange juice - 1 cup
Heavy cream - ½ cup
Saffron threads - 1 teaspoon (bloomed in ¼ cup of hot, but not boiling water)

Method: Add orange juice to sauce pot on medium heat - allow it to reduce by ¼ . Once orange juice has reduced, add cream - let it reduce by ¼ again. Once the saffron has bloomed (in hot water, for 15 seconds), add saffron + flavored water into sauce. Whisk to incorporate saffron. Allow to cool and serve in a squeeze bottle.

  • “Green Death” - Spicy Avocado Sauce
Avocado - 2 whole, pitted and peeled
Sour cream - 3 tablespoon
Lemon juice - ½ tablespoon
Cayenne pepper - ¼ teaspoon
Salt - ¼ teaspoon
Sugar - ¼ teaspoon
Jalapeno - 1 whole, stemmed and minced (take a shortcut, use the food processor)
Milk - ¼ cup

Method: In the food processor with the minced jalapeno, add avocado, sour cream, lemon juice, cayenne, salt, and sugar. Pulse until it comes together. Add milk and puree until smooth.
--------------------------

These 3 sauces will be sure to keep your guests talking - or hopefully not talking - they should be busy eating.

Other essential accompaniments for the Fajita Bar include:

- Caramelized Onions
- Roasted Peppers
- Sour Cream
- Pico de Gallo

Cook up a pot of pinto beans and some Spanish rice, and you've got a Big Time Live spread that your guests will be raving about.

Copyright 2010, Brian Griess, All rights reserved